50/50 Week 15: Canadian Butter Tarts

Ingredients:

Crust

  • 2 1/2 cups AP flour
  • 1 T sugar
  • 1 t salt
  • 1 cup cold butter
  • 3/4 cup cold water

Filling

  • 1/4 cup butter (room temp)
  • 1/2 cup brown sugar
  • 2 eggs (room temp)
  • 1 cup maple syrup
  • 1/4 t salt
  • 1 t vanilla extract

This goes super quickly if you use a food processor for the crust. Put your flour, sugar, and salt in and add your cold butter in chunks. Pulse until the butter is in small pieces..about 8 times. Slowly add your cold water and pulse until the dough starts to come together. (It will still be a little crumbly but should hold its shape if you press it together)

Wrap your dough in plastic wrap and pat into a disc. Refrigerate for at least an hour.

While your dough is chilling, work on the filling. HA wow..unintentional rhyme 😅

Using a hand mixer or stand mixer, cream together your butter and sugar. Add eggs one at a time, mixing well between each. Add maple syrup, salt, and vanilla. This will look…well, frankly it will look curdled. Its not, I promise. It makes everything easier if you put your filling in a large glass measuring cup with a pour spout for later. If you make the filling and let it sit for a while until you’re ready to use it, you’ll need to give it a good whisk before using it.

Preheat oven to 350F

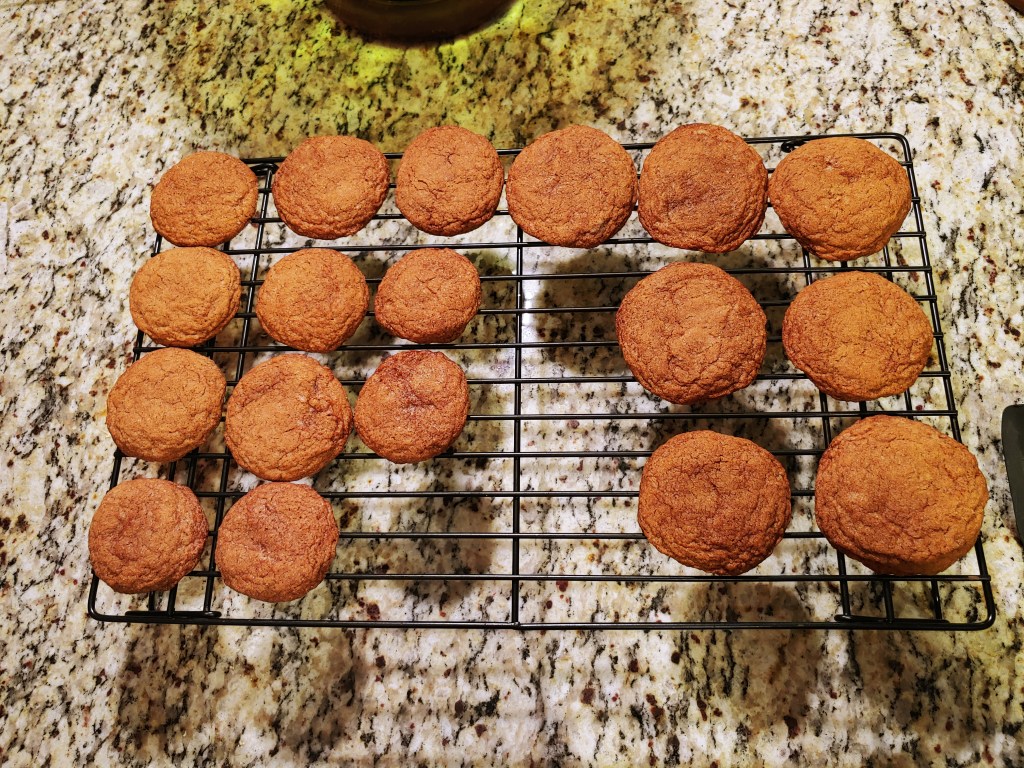
Now back to that dough! Separate into 2-3 portions. Put the dough you aren’t actively working on back in the fridge. Flour your counter and roll out until its about 1/8 of an inch thick. Use a biscuit cutter that’s about 4 inches across (I used a glass and cut around it) Grease a muffin pan and place your dough rounds in each cup. If you’re a slow cutter/its warm, place your muffin pan in the fridge while you work.

Now whisk up your filling and pour just over half way up for each cup. Do not overfill/spill. It will be a mess and is not gonna be a fun time. I have 2 – 6 cup muffin pans so I placed them on a cookie tray in case of any spillage/stability. Bake for 25 minutes and let cool for 5 minutes before removing and placing on a cooling rack.

Let these cool or they will be like fucking lava in your mouth. You’ve been warned!

These were so delicious and I’ve never been happier to send things to work with my wife. They were all gone before lunch 😉

50/50 Week 14: Ethiopian Himbasha

So, first things first..I’m not 100% sure that this came out the way it was supposed to. In the end it’s still delicious. I think the pattern was supposed to be carved deeper for it to come out better but who knows.

I used this recipe and it worked beautifully. https://www.mycookingjourney.com/himbasha-hmbasha-ambasha-ethiopian-flatbread/ I will say that if you’re using your food processor, you’ll need to knead your dough by hand. Don’t kill your food processor.

50/50 Week 13: Tres Leches Cake

Holey moley me oh my…

I don’t know how I’ve never tried tres leches cake before. *chefs kiss* fucking delicious!

For this episode, I followed this recipe: https://ethnicspoon.com/traditional-tres-leches-cake/

I highly recommend this one. Its easy to follow and nearly impossible to fuck up. I will say I was a little concerned this would be overly sweet with the sweetened condensed milk, but it’s honestly perfect.

50/50 Week 7: Babka Cake

This week, I used this recipe: http://www.feastofstarlight.com/orphan-black-helenas-ukrainian-babka-cake/

One thing to note is that it doesn’t say to add the milk in the instructions, but you should add it in with the “sponge”

Overall this was a pretty easy recipe and despite the goof with the milk, I think it turned out wonderfully. It was also weirdly fun making something in trash. Cans that were otherwise destined for the recycling got another shot at life. Its very important to note that you don’t want to use cans with a plastic lining..no bueno in the cooking process.

This has been a crazy week. My wife had a hysterectomy and I’ve been trying to take care of everything around the house and making sure she’s happy and comfortable while still trying to keep up with my little project, which admittedly has seemed pointless with everything going on. Add in the fact that I’m having a particularly bad bout of shitty self-image while I’m trying to edit a video and well..we’re just feeling fucking peachy.

Onwards and upwards though. I know not many people see any of my efforts in my projects, but at the end of the day, I do it because its something I’ve always wanted to do. So, in my shittiest moods when all I want to do is give up and say “what’s the point?” I try to remind myself that I’m doing it for me.

50 Countries in 50 Weeks

I’ve spent the last few weeks since my birthday trying to decide what my next cooking project would be. After consulting with my wife and trying to get her coworkers input (lets be honest, they’ll be eating most of it) we formed a plan. I’m using the royal “we” as it was really all my brilliant wife and I just took the idea and ran with it.

Pick 50 countries, and make a dessert from each of those countries. I did tweak it a bit, since I decided to diverge into non-dessert items for some countries. Nonetheless, the list has been made, the strips of paper cut out and now all I need to do is draw the first randomly selected assignment.

Since I have a clearcut path and a deadline, I think this will definitely force me to keep a schedule. Lord fucking knows I need one. These are crazy times we’re living and even crazier since I quit my job and started house-wifing it full time. I stay busy, but I also want to focus on my personal projects, no matter how down I find myself getting.

Is it just me or has literally everyone decided to start a cooking channel on youtube during this fucking pandemic? Fuck it. As it currently stands, I have a whopping 44 subscribers. I know, I know..going to start getting recognized in public soon. Alas, earwax.

Onwards and upwards, my friends. We started this for fun and we’re going to keep fucking going; learning and creating new and exciting things along the way ❤

See you next Tuesday

M

Russian Apple Pie + Moscow Mule

For this weeks video I decided to make Russian apple pie via https://www.tiktok.com/@russianforamericans?source=h5_m

Russian Apple Pie Ingredients:

  • 4 apples peeled and sliced (I used fuji)
  • 4 eggs
  • 1 cup sugar
  • 1 cup AP flour
  • cinnamon
  • optional: nuts
  • optional: vanilla

Preheat oven to 375 F

Start by peeling and slicing your apples. In your mixer place your eggs and sugar and beat until fluffy (about..10 minutes) add in your flour gradually and mix until just combined. If you want to add vanilla you can, but the original recipe doesn’t call for it.

Butter your pan (I used a springform) you need something that’s fairly deep. Put half of your batter in the pan, then add your apples. Sprinkle with cinnamon and if you wish, add nuts. Then top with the rest of your batter and bake for 40 minutes.

Super simple. Let it cool and then slice and enjoy 🙂

If you’d like to be a little extra like myself, why not have a drink or two…

Moscow Mule Ingredients

  • 1 1/2 oz vodka
  • 1 tsp lime juice
  • ginger beer ~4 oz (or whatever your tastes are)
  • optional: candied ginger

Traditionally served in a copper cup, start with about half of your cup full of crushed ice. Add vodka, lime, and ginger beer. Stir, drink, enjoy.

Homemade Marshmallows

This is a very messy project. You’ve been warned..

Ingredients:

  • 2 1/2 Tbsp of gelatin (or 8 sheets)
  • 1 cup cold water(divided)
  • 2 cups of sugar
  • 1/3 cup corn syrup
  • 1/4 tsp salt
  • 1 tsp vanilla extract
  • 1/2 cup powdered sugar
  • 1/2 cup cornstarch

To start off, go ahead and mix your powdered sugar and cornstarch together and set to the side. You’ll use this throughout this daunting process.

First things first, get your gelatin going. Having used the sheets for the first time here..I recommend probably going with the basic ass powdered gelatin. Combine your gelatin with 1/2 cup cold water and let it soften for at least 15 minutes. Put this directly in your stand mixer with the whisk attachment but don’t whisk it just yet.

Grab a small saucepan and add the other 1/2 cup water. Make sure when adding your sugar, you add it to the direct center of your pan. Do it slowly so you’re not splashing about. You want to avoid getting the sugar on the sides of your pan so you don’t end up with grainy marshmallows. I don’t care what you think, but peeps are disgusting. Also add in the corn syrup and salt. DO NOT STIR. Seriously, put the spoon down. If you’re feeling antsy, you may swirl the pan gently. Thats all you get though.

Bring to a boil but don’t let it bubble over. You want to get your mixture to 240 degrees F. Once this temperature is reached, remove from heat. At this point, your gelatin should be good to go. Turn your mixer on low to break up the gelatin. Then slowly (seriously, SLOWLY) add your liquid hot magma of sugar syrup into the gelatin. Try not to just pour it down the side of the bowl but don’t pour it on the whisk either..I promise there’s a happy medium here.

Once the syrup is all added, increase your mixer speed to high and continue to whip the devil out of it for at least 10 minutes. Around the 10 minute mark, add in your vanilla. You can feel the sides of your mixer bowl to know when its getting close as well. You’ll want it to be thick and fluffy, and warm but not remotely hot.

Instead of just standing around while your mixer does all the work, use this time to prepare your pan. Spray a metal pan (9×13 would work beautifully) liberally with cooking spray. Then take your powdered sugar mixture and sprinkle your pan with it so that you can coat all the sides well. (Don’t use all of your powdered sugar, you still need this.)

Once your marshmallow fluff is all fluffy, you’ll want to work fast to get it all out of your mixing bowl and into your prepared pan. You won’t be able to get your bowl completely cleaned out. Seriously, you won’t. Just do your best. Now that your mixture is in the pan, just tap it on the counter to even it out a bit and sprinkle with more of your powdered sugar mix.

Leave it out on the counter to sit at room temperature for at least 4 hours. Go put your feet up..or maybe start cleaning some dishes..I know you’ve made a mess.

Lets start this party by dusting your clean counter/work area with, you guessed it, more powdered sugar mix. Turn out your marshmallows onto your dusty surface (heh) This may take some coaxing. I had to scrape that sugar loaf out. You can spray your knife with cooking spray, though I don’t think this really made any difference at all. Its going to stick regardless. As you cut up your marshmallows, toss them in your remaining powdered sugar mixture. Store in an air tight container once well dusted. They’ll keep easily for a week or two..unless you eat them.

That’s it! Its quite an undertaking, but the results speak for themselves. You will have a super messy kitchen, but you’ll also have these soft little pillows of happiness that taste nothing like store bought marshmallows.

French Fucking Macarons

Learn from my mistakes please.. This was a trial by fire but we made it out alive. Just do yourself a favor and buy almond flour…

Ingredients

Macarons

  • 100 grams egg whites
  • 50 grams granulated sugar
  • 200 grams powdered sugar
  • 110 grams almond flour
  • 1/4 teaspoon cream of tartar
  • pinch of salt

Buttercream

  • 1/2 cup butter
  • 1 1/2 cup powdered sugar
  • optional: 2 teaspoons of homemade raspberry jam (or literally whatever flavoring you want)

Step 1: Assemble all of your essentials. Silpat or Silicone baking mat..or two. and get your scale ready and set for grams. You could theoretically make this with american measurements, but I’m personally going with the “if it ain’t broke” method and weighing everything out..when in Rome and all that

Beat your egg whites until foamy. Gradually add in your granulated sugar, cream of tartar, and pinch of salt and then beat until glossy, fluffy, and holding soft peaks. At this point, I added the coloring as well.

Sift together powdered sugar and almond flour

Gradually fold into your egg whites..as few strokes as possible to avoid deflating your mixture

Now this is where is got a little dicey for me..you want to incorporate it in as few strokes as possible but you also want it to be mixed well enough that it will flatten down into itself…so…just play with it and hope for the best

Put your mixture into a piping bag with a regular round piping tip..or if you’re fancy..a large ziploc with the end snipped off 🙂

I recommend keeping your sploops of batter fairly small…1 1/2 inch diameter-ish. The smaller ones definitely seemed to work a lot better.

After you’ve piped out all of your batter, put your baking sheets in a semi warm, non drafty area to sit for an hour. Your macarons need to dry and form a skin. You’ll know they’re good to go if you can lightly touch them and not have your finger stick.

Preheat your oven to 285F

Bake for 10 min. They should be set but not browned.

Once they’re done, put them on a cooking rack to cool completely. Don’t try to peel them off immediately..you’ll regret it. Once they are COMPLETELY cooled, gently..GENTLY pry them off your baking mat. About half of mine got jacked up because I made them way too big. But you know what? They still tasted the same.

Make your buttercream by creaming together your butter and powdered sugar. Add in your flavoring (jam in my case) and voila!

Pipe your buttercream on your macarons and make lil sandwiches. Easiest part of the whole process!

Don’t come for my sizing hahaha Do as I say..not as I do.
As you can see, the little ones did the best. The little ridged part at the bottom is what you want to see. Letting them sit and dry is essential to form the “foot”

Banoffee Pie

Ingredients:

  • 1 can of sweetened condensed milk
  • about 10 graham crackers
  • 5 Tablespoons melted butter
  • 1/3 cup sugar
  • 2 bananas
  • 2 cups of heavy whipping cream
  • 1/4 cup powdered sugar
  • 1 teaspoon vanilla extract
  • optional: dark chocolate to shave on top

Preheat your oven to 350

You can put the can of sweetened condensed milk in a pot of boiling water for 2 hours..but since that can result in an explosion..I avoided that method like the plague.

So, get a deep sided pan large enough to put a partially submerged pie plate in. Place a pie plate inside the pan and pour out your sweetened condensed milk. Put warm water into the pan until its about half way up the pie plate. Cover loosely with aluminum foil and bake for 2 hours.

For the crust, if you choose, you can just get one of those premade graham cracker crusts. Making it yourself is super easy though. Crush 10 graham crackers..either by hand or in a food processor. Stir in the sugar and melted butter. Then just press it in a pie pan by hand or with the help of a flat bottomed measuring cup. Set aside until your toffee concoction is done.

After 2 long hours, carefully remove the toffee colored gloop from the pan and set aside to cool. I stirred mine a little so that it smoothed out..it was a bit chunky at first.

Put your pie crust into the oven for 15 min.

Make your whipped cream. For the love of all things holy, please do not opt for Cool Whip. Just don’t..

In a stand mixer, or with a hand mixer, combine the heavy whipping cream, powdered sugar, and vanilla on med-high speed for about 4 minutes until you get medium-stiff peaks.

Once your pie crust and toffee gloop have cooled, spread it into the crust. then slice your bananas and layer them on top. Then add your whipped cream. Super simple construction!

mmmm bananas..
Finished product. Doesn’t have to be perfect, but still super delicious

Fresh Ginger Cookies

Ingredients

  • 2 1/4 cup AP Flour
  • 1 teaspoon Baking Soda
  • 1/2 teaspoon Salt
  • 2 Tablespoons Fresh Grated Ginger
  • 3/4 cup Butter (softened)
  • 1 cup Sugar
  • 1/4 cup Molasses
  • 1 egg

In a separate bowl, combine your flour, baking soda, and salt. Set aside

Peel and grate your fresh ginger and add it into the bowl with your butter and sugar. Beat until fluffy.

Add in your molasses and egg and beat until combined.

Add in half of your dry ingredients and beat until combined. Add the rest and then just mix until just combined. (I’d do this by hand)

Put about 1/2-3/4 cup of sugar in a bowl. This is additional sugar. Don’t Panic! I didn’t add it into the initial list of ingredients. Form about 1/2 sized balls of dough and then roll it in sugar before placing on a cookie sheet.

I recommend using parchment paper because I’m lazy as fuck..and its super easy.

So, line your cookie sheet, and place your balls about 2 inches apart. . The cookies..keep your mind out of the gutter.

Okay..back on subject. Bake for about 15 minutes and let them cool for about a minute on the cookie sheet before transferring them to a cooking rack.

This are super duper yummy and easy to make. I personally really love the bite of fresh ginger so you could add a little more than the recommended 2 tablespoons if you like and I think they’d still be delicious. Just make sure to let your friends and family know there is fresh ginger in there since it kinda looks like hair…..